- Published on
How to Use Your Own Custom Domain with Gmail for Free
Table of Contents
Advantages of Gmail
When you sign up for website hosting, you’re almost guaranteed to also get access to professional email addresses through them.
However, their email clients suck – most look like they stopped updating their user interface in 2003. They often have terrible UX. Gmail, on the other hand, is fantastic – it looks great, it works great, you already have one and know how to use it.
Gmail is free.
Google does a very good job of securing the Gmail service itself from third party attacks. (Of course, this is different than securing your account from an attack, where you bear a lot of the responsibility based on what password you select and what additional measures you put in place to protect your account.)
Gmail also has arguably the best spam protection engine.
Why not use G-Suite?
$60 per year, per account, for every domain you own? That might be expensive.
1. Get a Custom Domain
The first step is to get a domain name from a reputable domain name registrar.
I recommend Cloudflare Registrar - a service for registering domain names that doesn't mark up the price for doing so. It offers essentially the same services as other domain name registrars but without markups, without increased renewal fees and comes with additional security features. In essence, Cloudflare Registrar is free – the only cost is what is charged by registries and by ICANN.
Ensure your DNS has email forwarding
In this guide, I will be considering Namecheap.com and Cloudflare. They both have it.
If your DNS doesn’t have this feature consider using Cloudflare: it comes with a tonne of benefits you can consider transferring your domain to Cloudflare or changing your authoritative nameservers to Cloudflare’s.
2. Receiving Mail
This will automatically forward the incoming traffic to any destination inboxes you wish.
You can effectively start receiving Emails in any of your domains for any number of custom addresses you want and forward the messages to any existing destination mailboxes (Gmail, Outlook, etc).
With Cloudflare
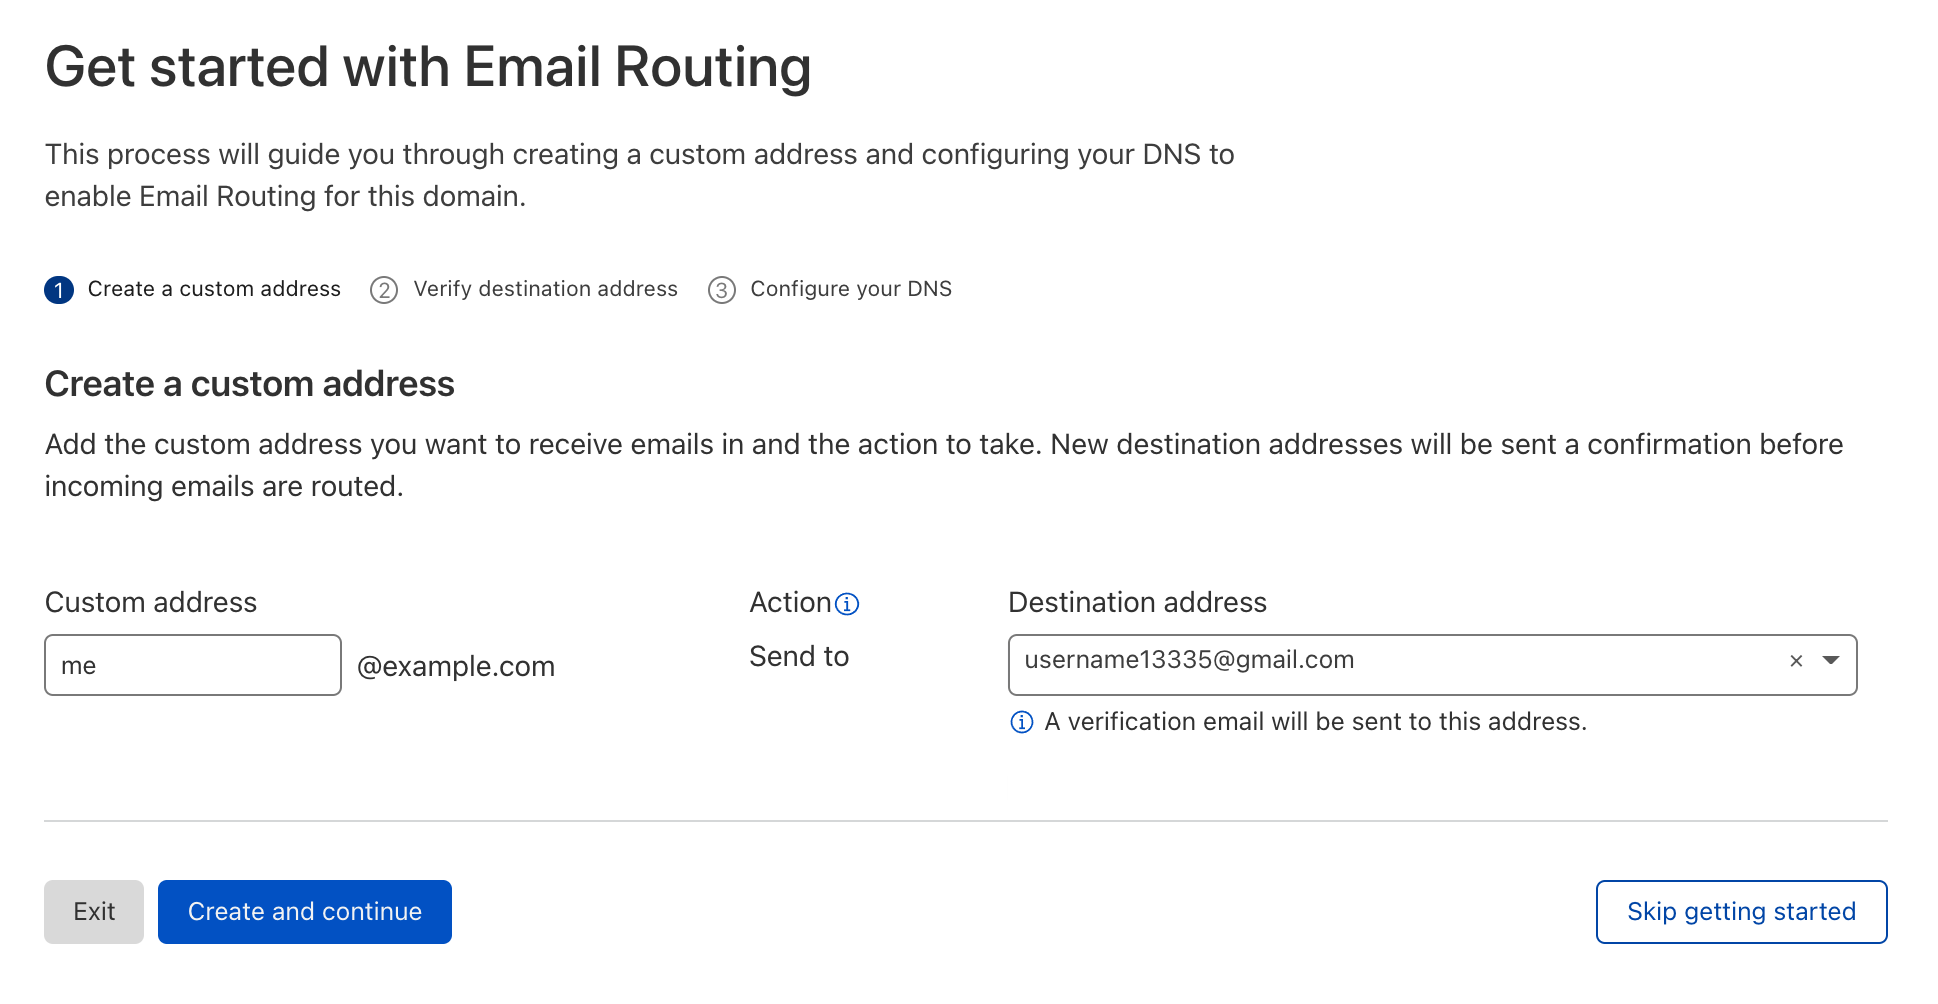
Log in to your Cloudflare Dashboard and select your zone and click "Email" in the left navigation panel.
Create a custom email address or your domain (in my case [email protected]) then type in the destination email address (your Gmail address - in my case, [email protected]).
This step will trigger sending a confirmation email to [email protected] so that they can prove that the destination Inbox is yours. You need to open Gmail and press the verification link.
Then, in the last step, you need to configure your zone MX and SPF DNS records. They will do this automatically for you. Just press "Add records automatically".
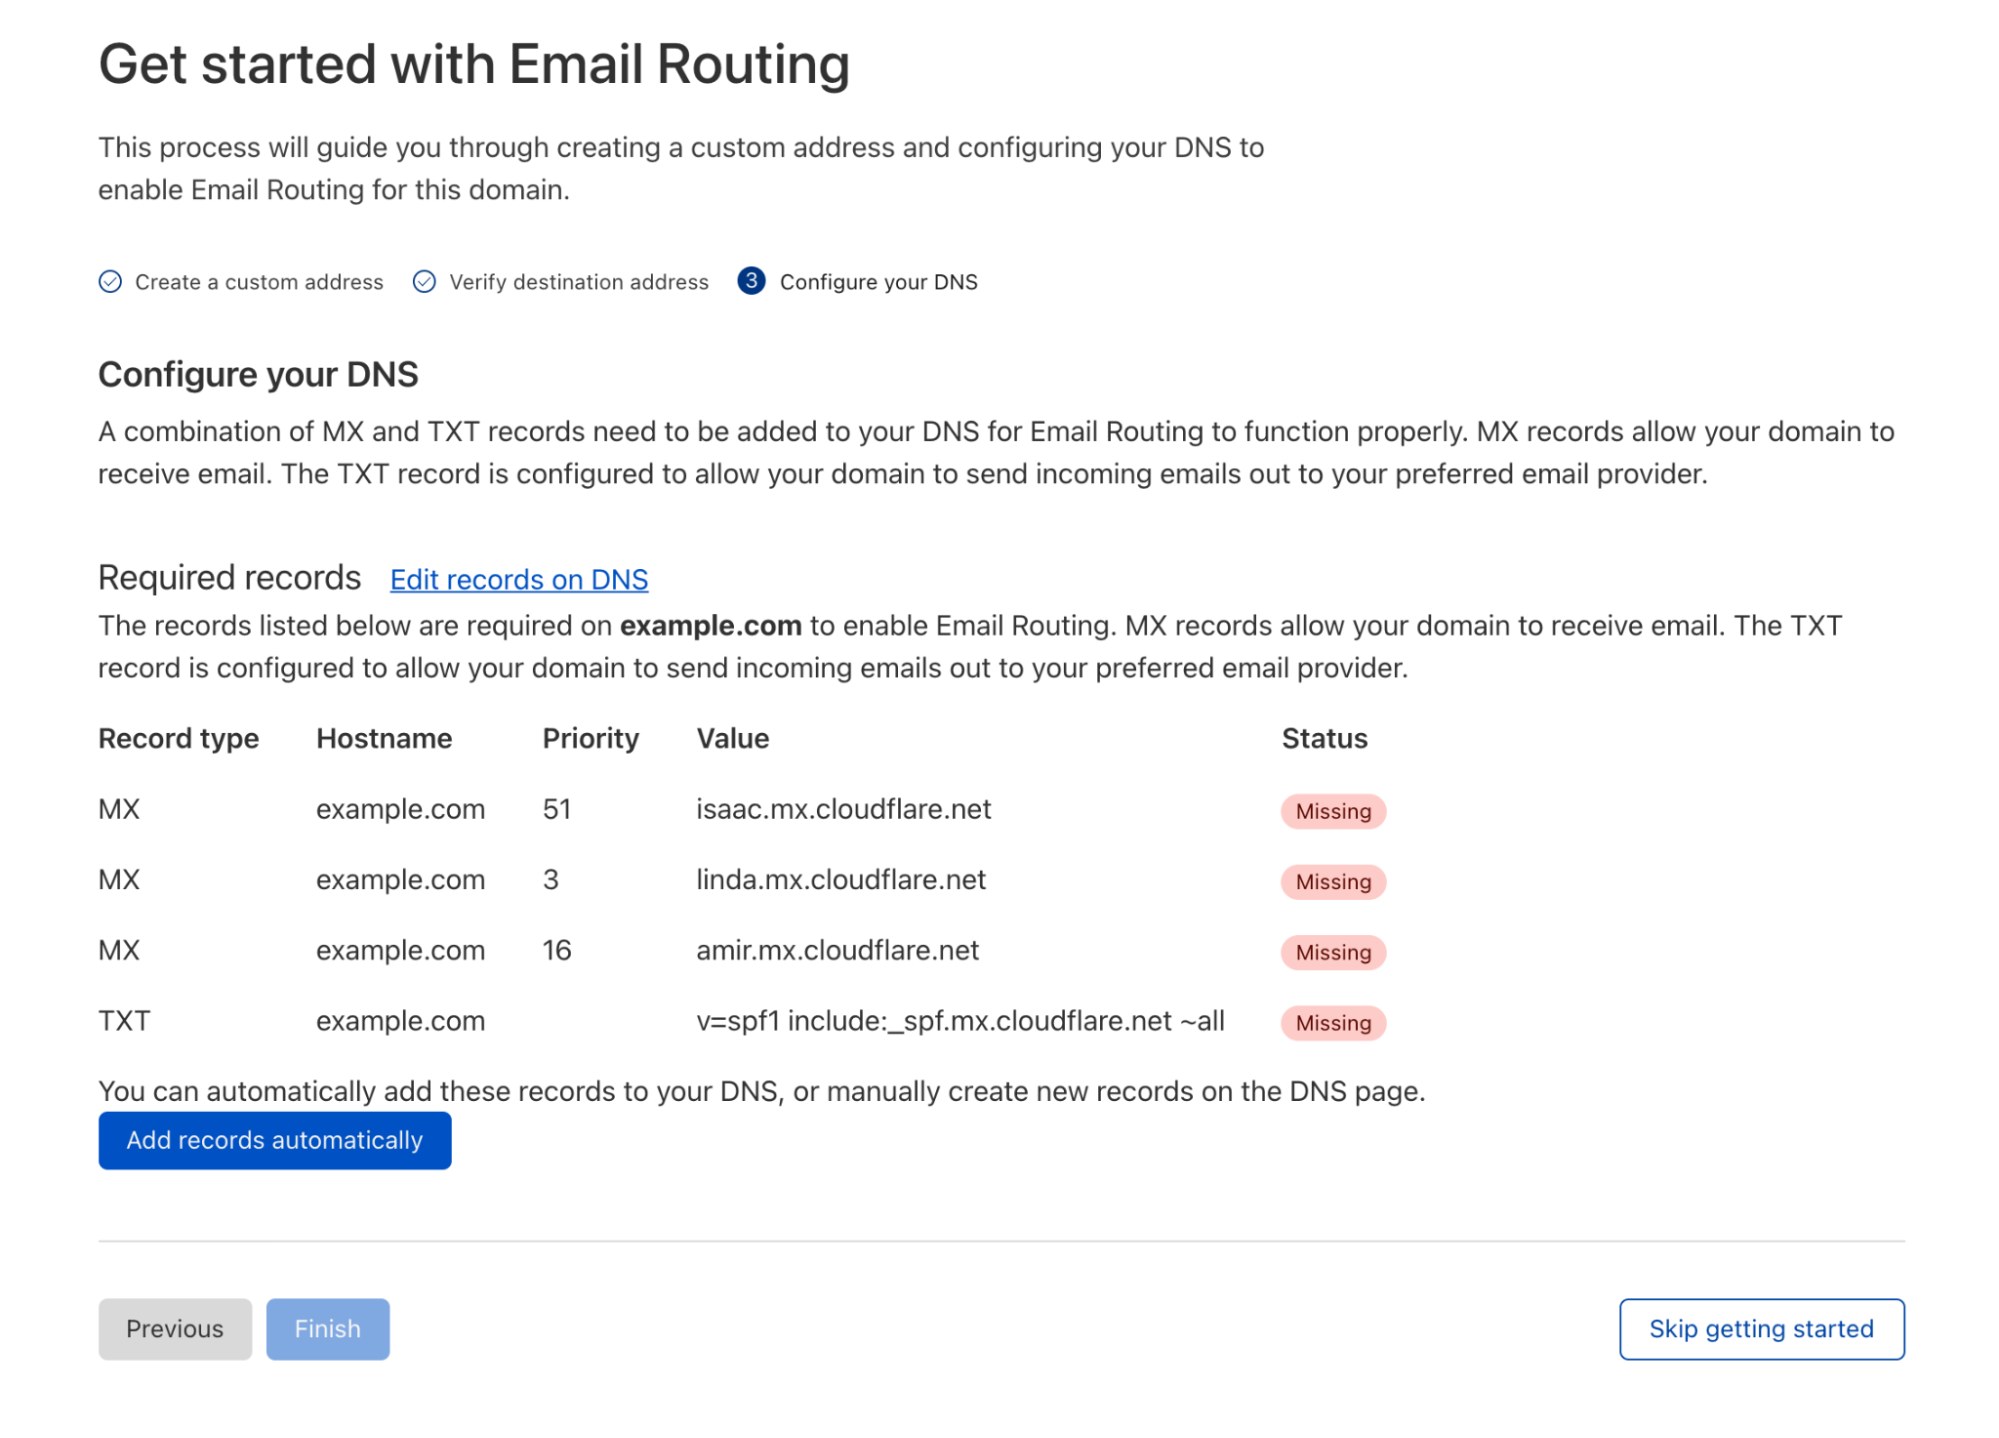
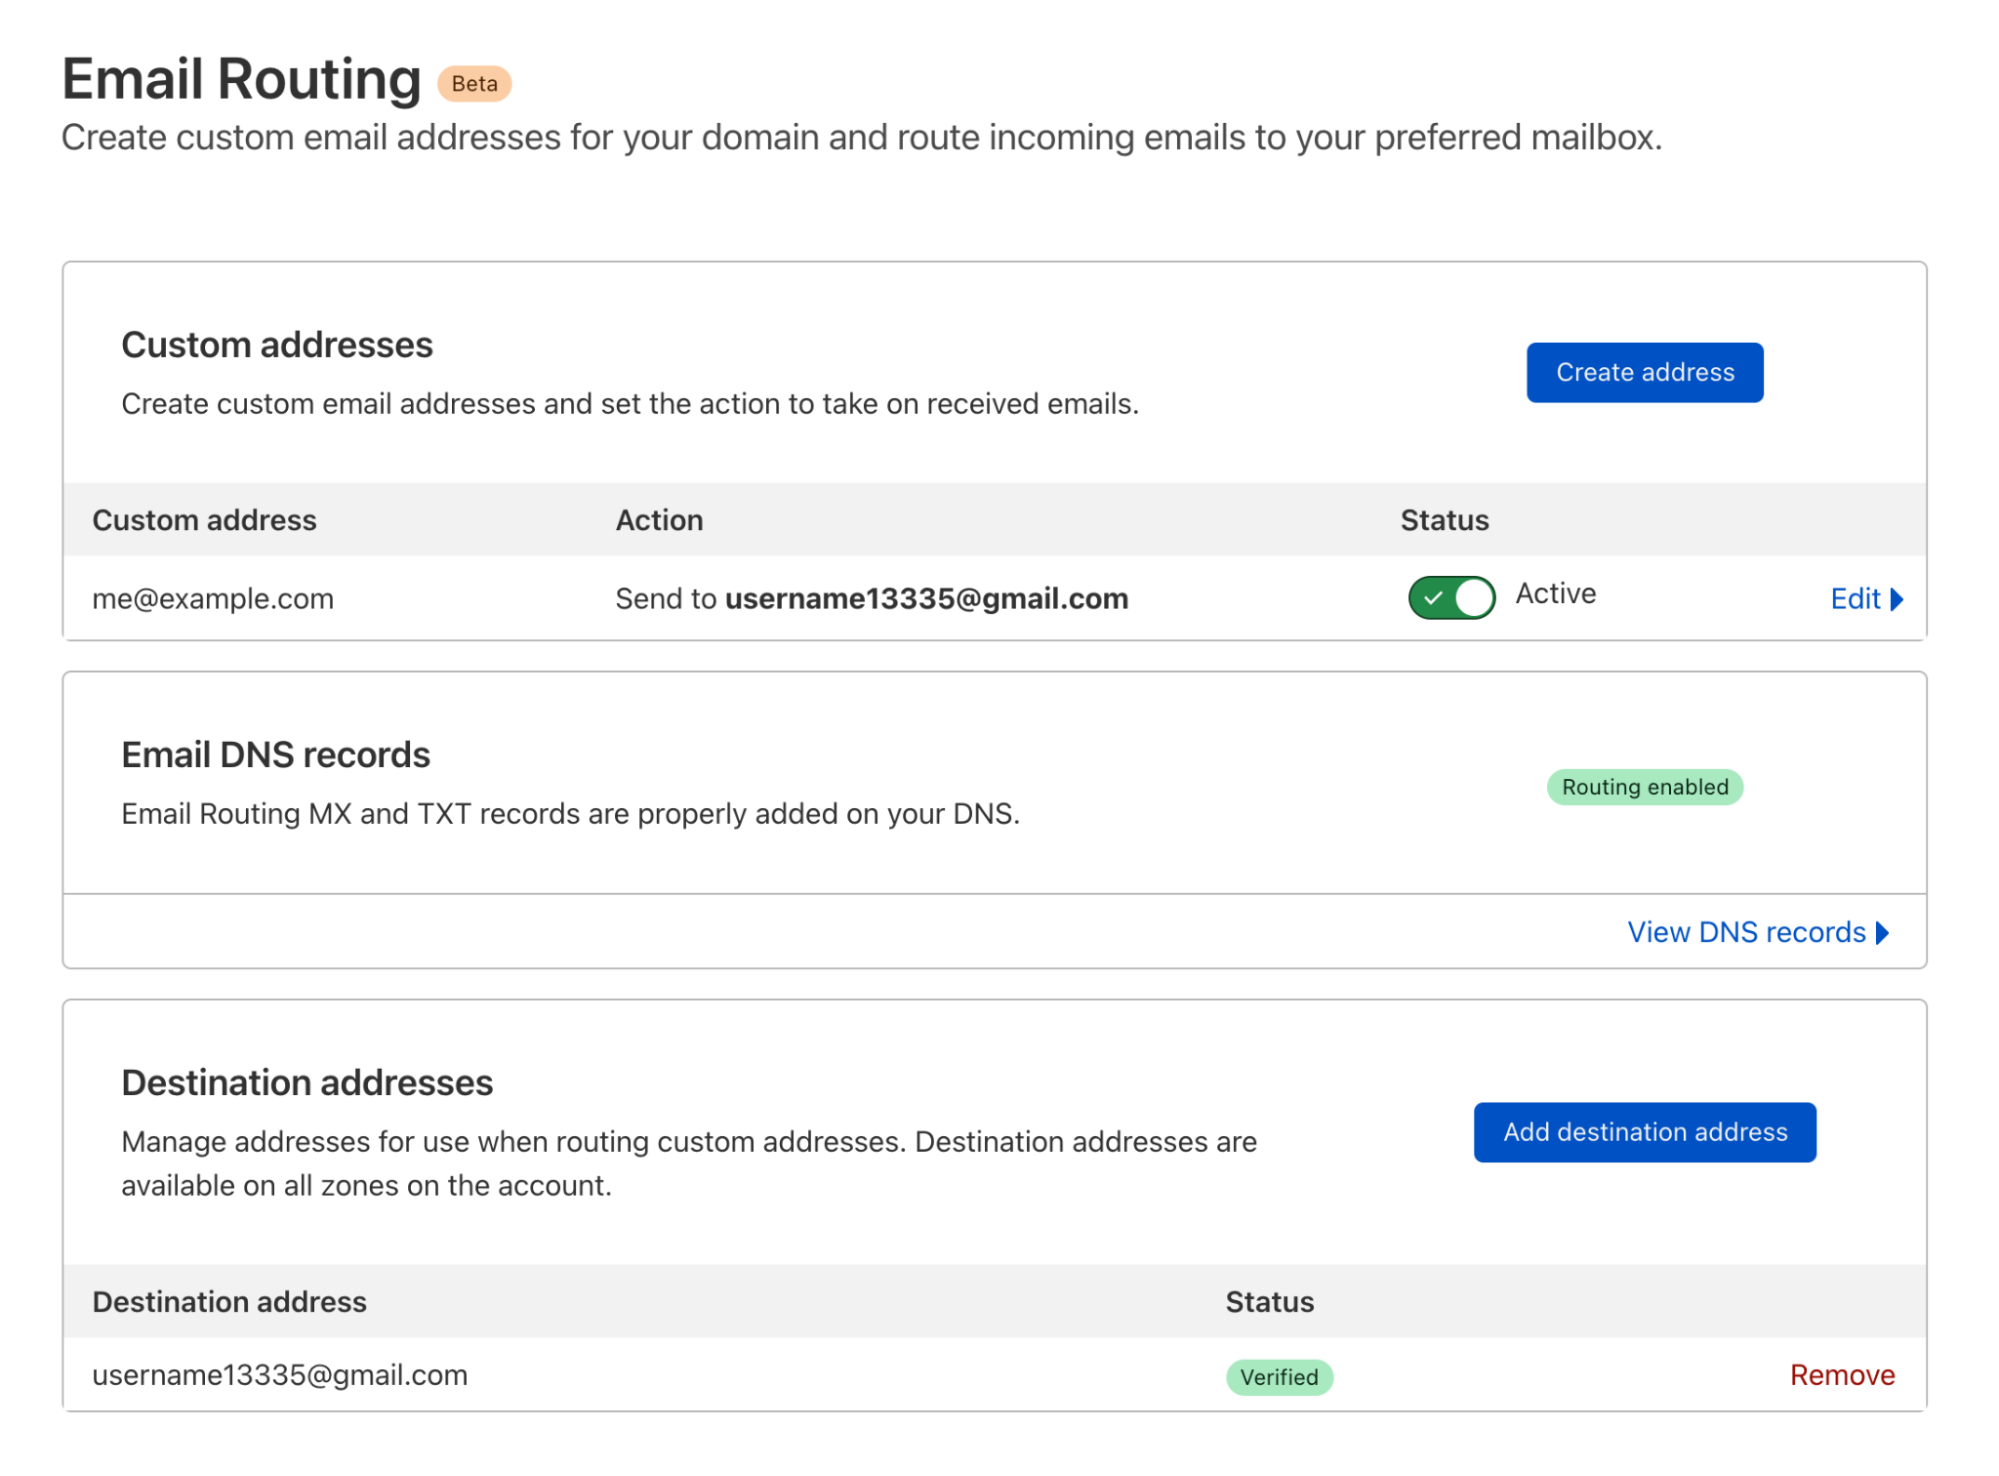
That’s it, Email Routing is now configured, and you can start sending emails to [email protected] and read them at [email protected] in Gmail.
That's it!
With Namecheap
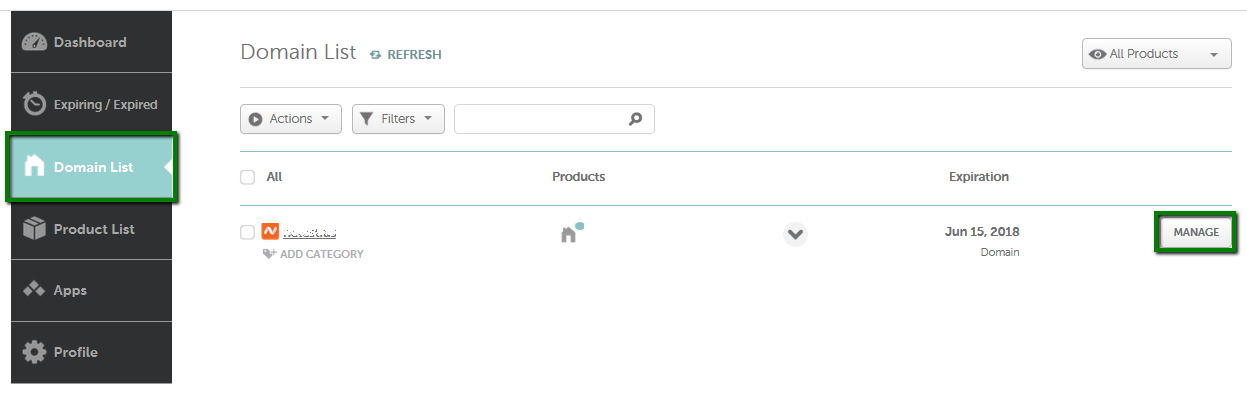
Sign in to your Namecheap account (The Sign In option is available in the header of the page). Select Domain List from the left sidebar and click on the Manage button next to your domain.
Navigate to the Advanced DNS tab at the top of the page:

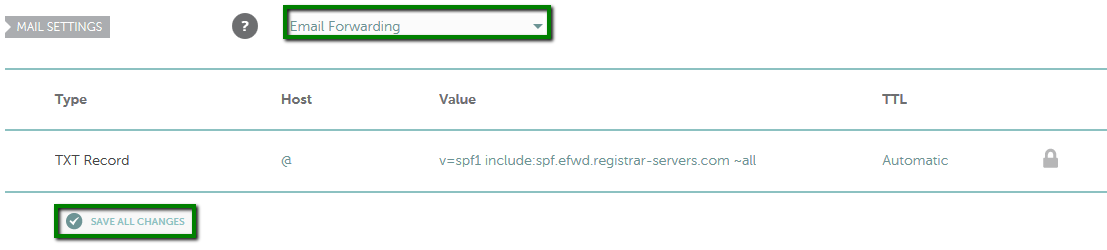
Find the Mail Settings section and select Email Forwarding from the drop-down menu. MX records will be set automatically once you save all changes:
Choose the Domain tab on top of the page and scroll down to the Redirect Email section. Click on the Add Forwarder button:
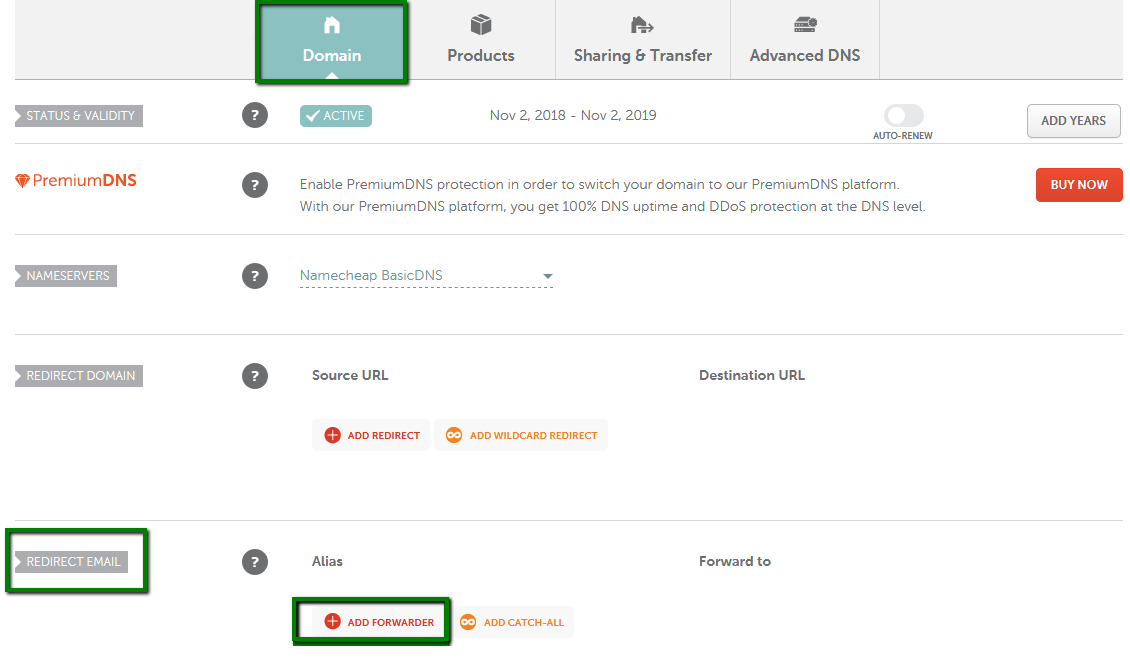
Fill in both the Alias and Forward to fields with the corresponding information and click on the checkmark icon to save the changes. Alias is the name of your forwarding mailbox. For example, if you are forwarding all emails sent to [email protected] to your destination email address, you will need to put admin in the Alias field (it is also possible to forward the same alias to several email addresses).
Make sure that the Forward to field contains your full destination email address as well.

Please allow about an hour for newly created mailboxes to be completely set up on the forwarding mail server.
That's it!
3. Sending Mail
Set up Google App Password
Set up an App Password for your Gmail account to allow you to use the Gmail SMTP servers securely.
Go to the Gmail account. Click your username or user icon in the upper right corner to bring up the user menu and click My Account
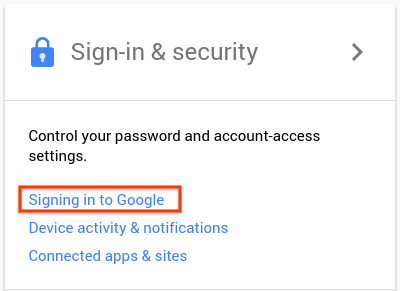
In the Google account screen, under Sign-in & security, click Signing in to Google.
In the Password & sign-in method box, click App passwords.
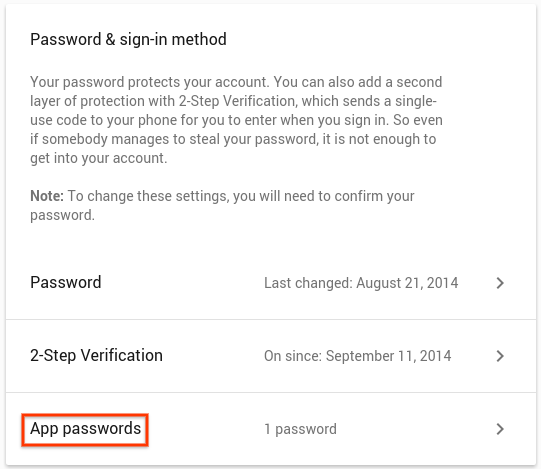
You must have 2-Step Verification enabled for the App passwords option to be available. If it is not, click 2-Step Verification and enable 2-Step Verification. Then continue to set the App password.
In the App passwords box, select Mail for the app, and select Other for the device.
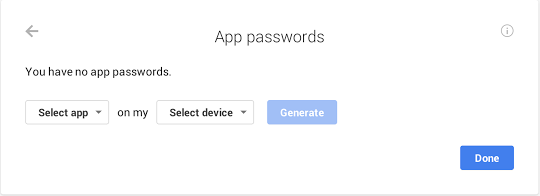
Enter the name of your domain (or any other memorable name) for the “other” device, and click Generate.
The Generated app password box will display a 16-character password. Copy this password. You will need it when you add your new send-as (forwarded) account.
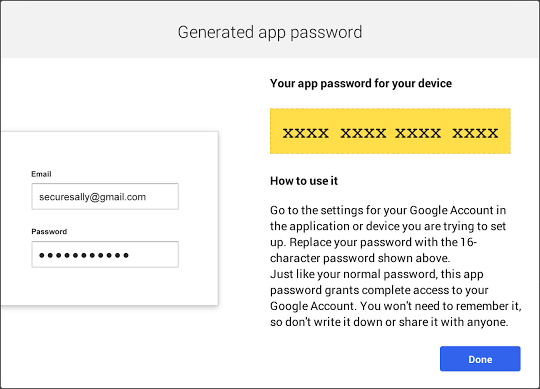
Click “Done” and return to Gmail.
Connect custom domain to Gmail
You will need to add the alias email address as an account to your Gmail inbox.
In the top right corner of Gmail, click on the Settings button, then on See all settings. In the Settings screen, click the Accounts and Import tab.
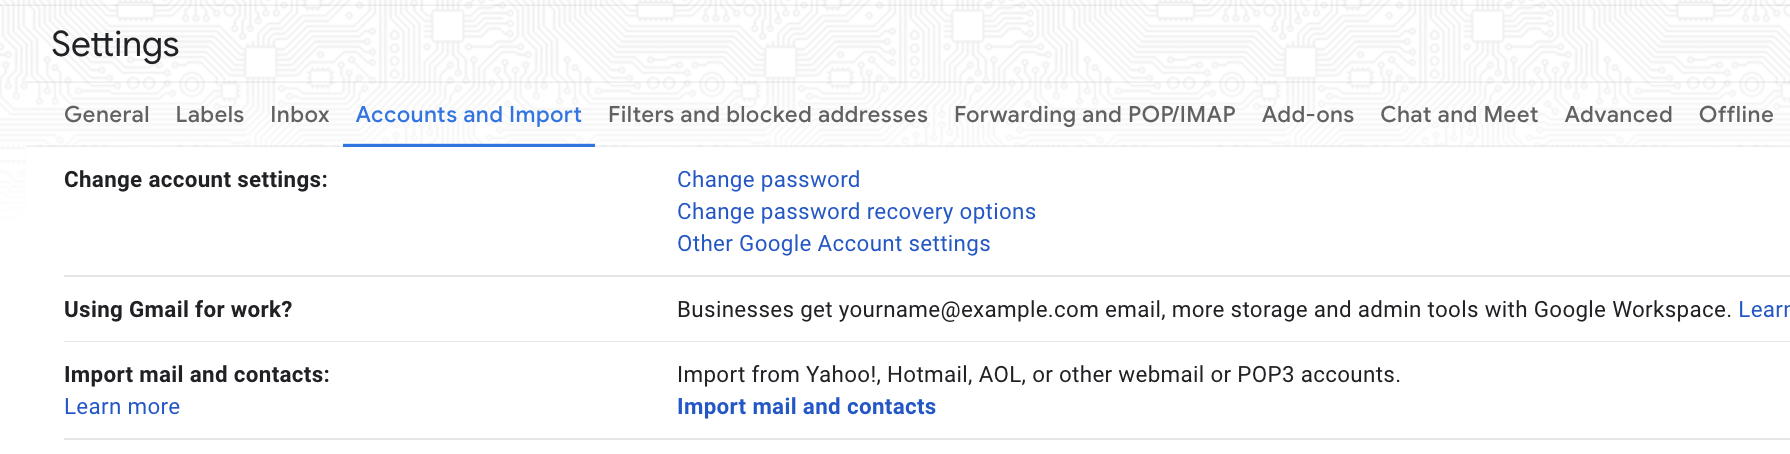
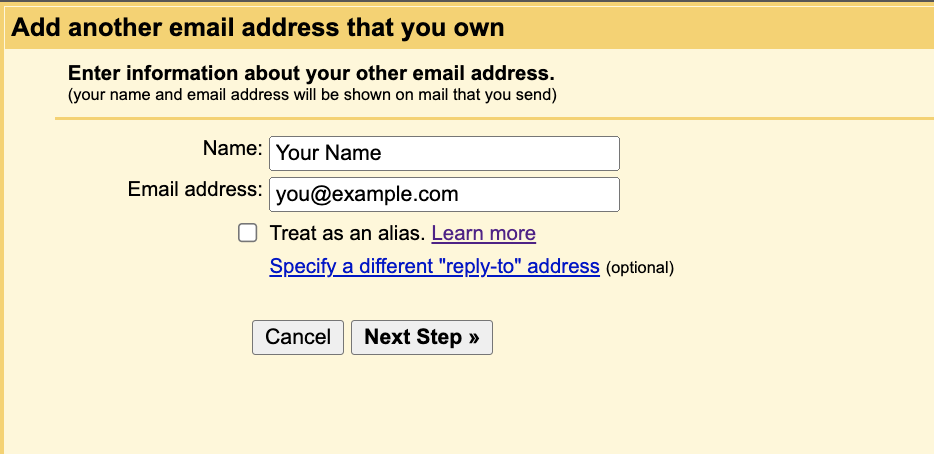
Scroll down to Send mail as and click Add another email address you own. In the first Add another email address box, enter the name you want recipients of your email to see and the forwarded email address you are setting up (the email address you set up in step 2) and click on Next step.
Set the Gmail SMTP server as the mail server for your forwarded alias. Change the values in fields to enter the following:
- SMTP Server:
smtp.gmail.com - Port:
465 - Username: Your Gmail account (the one you are logged in as)
- Password: The generated Google App Password
Click Add Account.
After you have successfully added the account, return to Gmail. You will see a message from Gmail Team with the subject Gmail Confirmation: Send Mail As and the address you have just added. Follow the instructions in the message to confirm the email address.
When you send mail from your Gmail account, click the triangle next to your From address to choose to send the message from the account you just added.
That's it!
Conclusion
You can now send and receive emails from Gmail using your domain name.
Sources: